Homemade Tortillas (grain-free, gluten-free)

There are those moments when you are disappointed with something new that you make in the kitchen,,, and then there are those moments when you could kiss yourself for finding the perfect new item! This post is one of those moments, and my family is loving me for this recipe too! It’s become a new regular staple in our house, and it’s super easy to make and delicious! Oh, and did I mention inexpensive?? Yes, you heard me right, an inexpensive healthy food item? What? You mean it’s not a ‘Whole Paycheck’ type item? LOL, no it’s not! It’s 4 ingredients, plus either butter or coconut oil to cook it in. You can make a couple of batches at a time and have them ready to go for convenience. These are a thick tortilla/burrito type wrap, that can be used for so many things… Breakfast burritos; veggie, meat, or fish tacos; sandwich wraps (think gyro style), quesadillas, and are even good just on their own.

The delicious tortillas are made with almond flour and are gluten and grain free. They are approved for cellular healing plan, are vegan (if cooked in coconut oil), and are paleo friendly. You can’t beat that right? But don’t take my word for it, check out our video on how to make these and see for yourself how amazing they are!

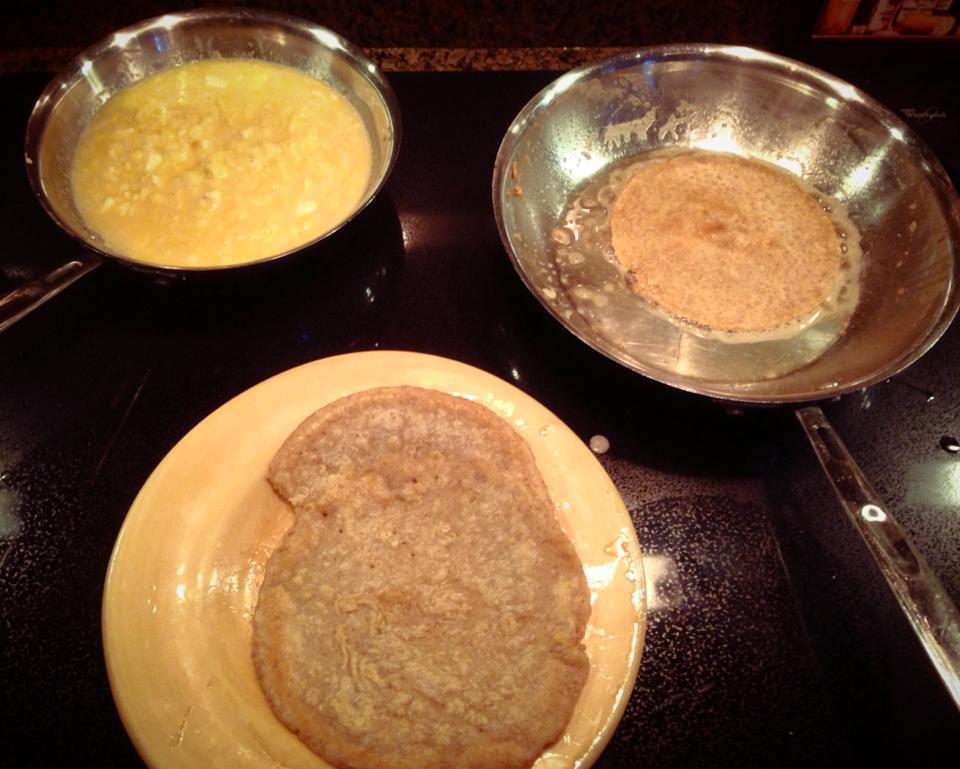
FYI… Be patient with your first time making these, it may take you a few rounds to get your stove top temperature and pan just right, but once you do there will be no stopping you. They are super simple to make, like a pancake!

Check out our How-To video for: Homemade Tortillas

Homemade Tortillas- Gluten Free and Grain Free

Ingredients:

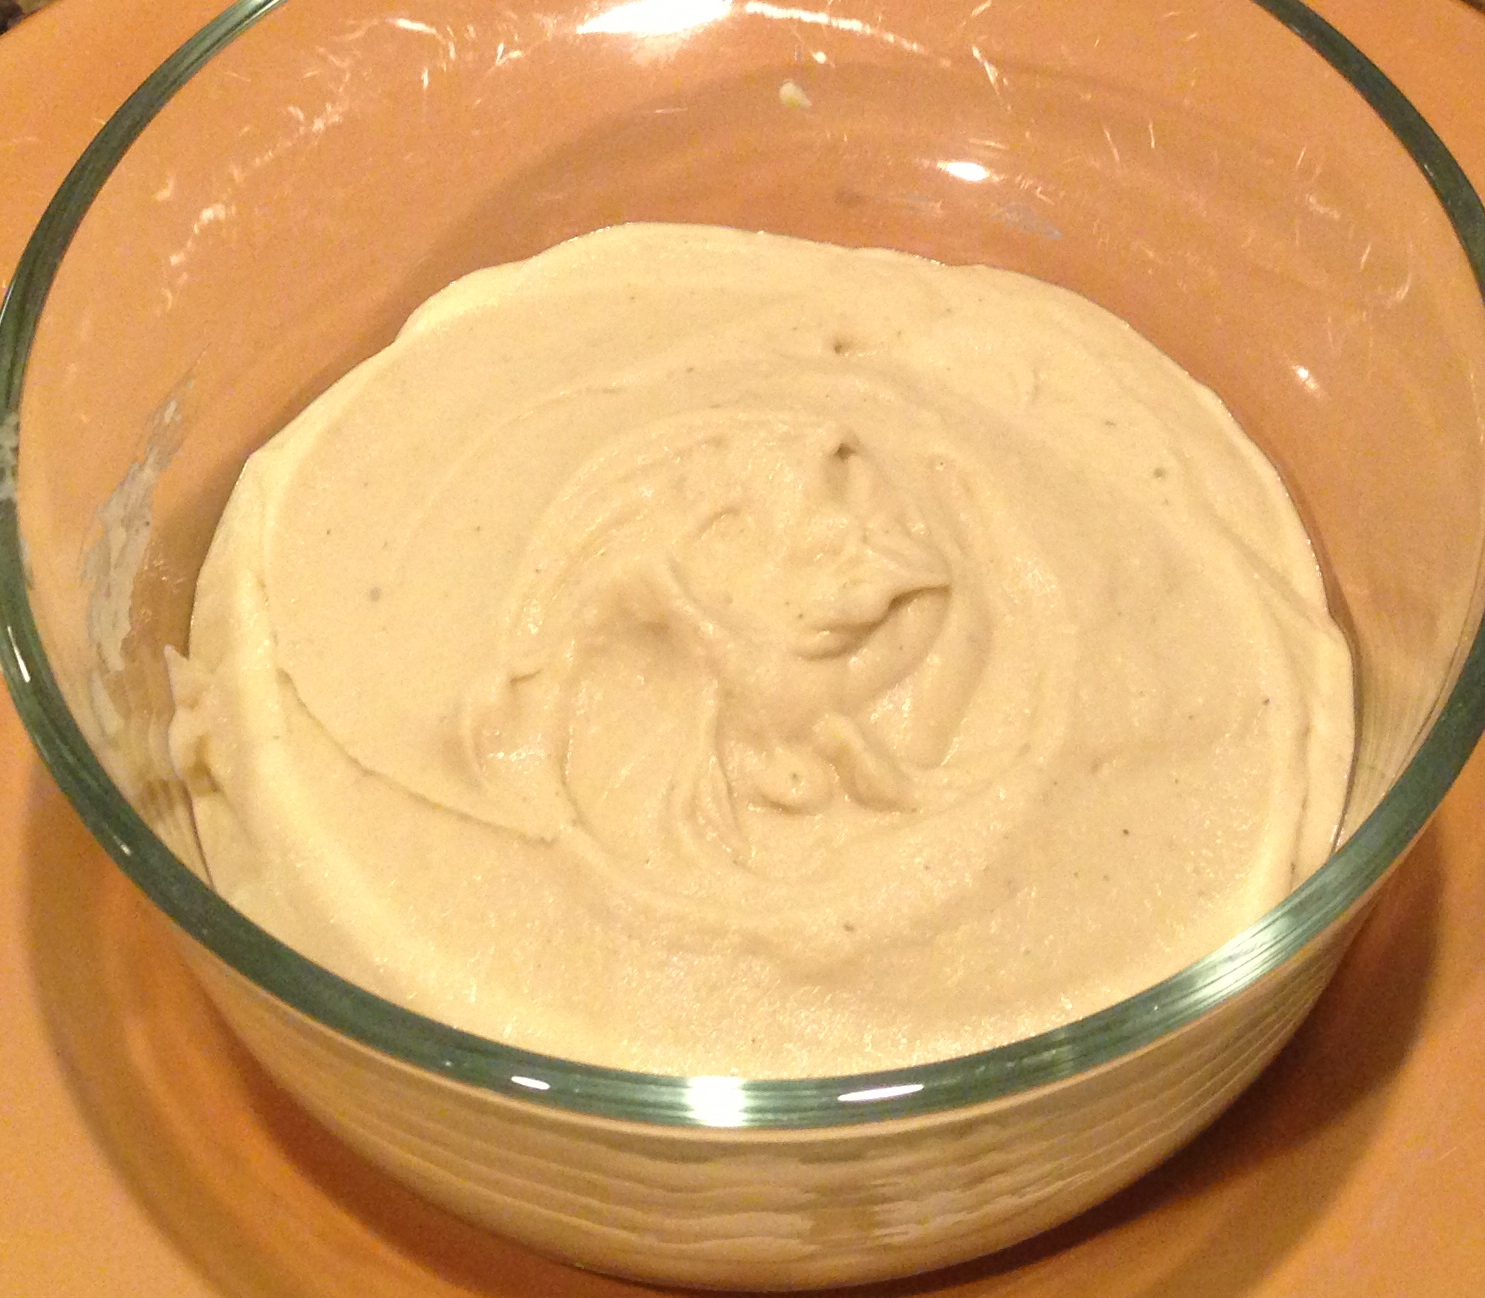
1 and ¼ cup almond flour

1 cup tapioca flour

1 cup water

1 tsp sea salt

~Raw organic butter or coconut oil for pan

1)   Mix all ingredients in Vitamix, blender, or whisk by hand till thoroughly mixed.

2)   Preheat oven to 350 degrees and line a baking sheet with parchment paper.

3)   Heat skillet on stovetop over a lower-medium heat. Add raw butter or coconut oil to skillet, then pour ¼ of the mix into pan. It should resemble a pancake.

4)   Cook for 2 minutes then flip tortilla over and cook other side for 2 minutes.

5)   Adjust stovetop temperature to low/med-low heat as skillet gets warm making sure not to burn tortillas.

6)   Repeat cooking the tortilla mix in skillet for each one adding a bit more butter or coconut oil between tortillas.

7)   Place tortilla on parchment paper-lined baking sheet and bake in oven for 10-12 minutes.

Serve and enjoy! This batch makes 4-5 nice size tortillas. You can also slice tortillas into triangle shapes and bake an additional 10 minutes in oven for homemade tortilla chips!

Favorite ways to enjoy these tortillas: breakfast burritos, grass-fed beef or fish tacos, open face sandwich, sandwich wrap, or toasted with butter and a stevia/cinnamon blend.

 11698546_10153444992682258_7930846136805628179_n


Garlic and Bean Dip

Quick and healthy snacks are always a hit in our household. So I was recently testing out some options for making fun, hummus-like dips with other types of beans, and have been enjoying this garlic-yyyy dip with fresh veggies and grain-free crackers. This is SUPER EASY and quick to make, and can be quickly adapted to your own likings. If you don’t like a strong garlic taste, you can omit the garlic clove and opt for garlic powder or leave the garlic out and have a simple bean dip.

IMG_6099

Garlic and Bean Dip

Ingredients:

1 can white beans (cannellini beans), drained and rinsed (prefer Eden brand beans)

1/4 – 1/3 cup organic olive oil

2 Tbsp lemon juice

1/2 – 1 clove garlic

1-2 tsp dried parsley

Sea Salt to taste

Directions: Add all of the ingredients to a high power food processor or blender (such as the Vitamix) and puree until desired consistency. Will last in refrigerator for several days and makes a delicious quick snack with fresh raw veggies or grain-free crackers. Can also be added to a meat dish or on top of a salad for a unique twist! Some add-in’s to this recipe can be: olives, roasted red pepper, roasted garlic, sundried tomatoes, or spinach.

This pairs great with our Rosemary Cracker Recipe. We also enjoy the Go Raw crackers, it’s one of my son’s favorites, and they are delicious dipped in this bean dip.

IMG_5900


Crockpot Chicken Taco Soup

This is a new crowd favorite! We had a house full of family and friends over on New Year’s Day to watch the Football games for the College Football Playoff Series. We were cheering on our Crimson Tide football team, and while the outcome of the Bama game was a sure disappointment, at least this new soup recipe was a WIN! I chopped everything very quickly that morning, then placed everything in the crockpot and didn’t think about it till 8 hours later when it was ready to serve. The house smelled amazing too!

Ingredients

1 tbls of unrefined coconut oil

2 lbs organic boneless skinless chicken breasts

15 oz can organic diced tomatoes (or fresh diced tomatoes)

2-3 cloves of fresh minced garlic

1 large, or 2 small organic bell peppers, chopped/diced

1 medium yellow onion, chopped/diced

2 cups organic free range chicken broth

1 tbls chili powder

1 tsp oregano

3/4 tsp paprika

1 tbls cumin

Sea salt and pepper to taste

Optional- for a spicier soup you can add a diced jalepeno or a few tbls of hot sauce. A few other add in options are sliced organic mushrooms or organic black beans.

Directions:

1) Place the tablespoon of coconut oil in the bottom of your crock pot or slow cooker.

2) Chop/dice all the vegetables.

3) Place the chicken breast in the crock pot, and then add in the onion, bell pepper, garlic (and any add on’s such as jalepeno or mushrooms) on top of the chicken.

4) Pour the chicken broth in to cover the chicken, followed by the diced tomatoes.

5) Add in the seasonings: chili powder, oregano, paprika, cumin, sea salt, pepper.

6) Cover the crock pot/slow cooker and set on the low heat option for approximately 6-8 hours.

7) As you are serving the soup, you can pull apart or shred the chicken into the serving bowls.

Toppings: A few options for adding to the top of your soup are organic sour cream, organic plain yogurt, shredded organic raw cheddar or jack cheese, and/or sliced avocado.

Serves approximately 6 people

IMG_5789


Baked Ziti with Lentil Pasta

Ingredients:

2 boxes of the Tolerant Brand Red Lentil Penne Pasta

Tomato Sauce approx 6 cups (can make your own or buy organic ready made sauce in Jar)

2 lbs fresh Mozzarella (1 lb cut into cubes and other 1 lb thinly sliced)

15 oz container of Ricotta Cheese (prefer natural by nature grass-fed brand)

1 1/2 cups freshly grated raw Parmesan Romano Cheese

2 cloves of garlic freshly minced

1 1/2 tsp dried parsley

freshly ground pepper and sea salt to taste

Directions: Preheat oven to 350 degrees F.

Bring a large pot of water to a boil, add a little sea salt, and boil the lentil pasta until al dente (approx 8-10 minutes). Drain pasta.

Meanwhile, in a large bowl mix the ricotta cheese with the fresh minced garlic and the 1 lb of cubed mozzarella cheese. Season with salt, pepper, and parsley.

Toss the cooked pasta with the cheese mixture, tomato sauce, and half of the parmesan cheese. Then transfer the mixture into a well greased (use coconut oil to grease dish) large baking dish. Sprinkle with the remaining parmesan cheese and top with the other half of the sliced mozzarella cheese. Sprinkle with sea salt and pepper to taste.

Bake until lightly browned and hot, approximately 20-30 minutes.

Serve immediately, approximately 8-12 servings.

IMG_5280IMG_5239IMG_5281


Grain-Free Gluten-Free Baking Mixes

We all have those days when we need a quick fix and quick recipe to make… I finally found a healthy convenient solution. On a recent trip to North Carolina I was exploring one of my favorite stores there called Earth Fare when I came upon this brand of baking mixes. It caught my attention quickly as I saw words like Gluten Free, Soy Free, Almond Flour, Coconut Flour, and Paleo-friendly. When I read the ingredients and the instructions, I knew I just had to try it out. I have clients tell me they would love to cook and bake more but they just run out of time. So this is a great alternative, you can have the mix done in about two minutes, and then in the oven it goes! My first item I tried from Simple Mills was the pumpkin muffin mix. I personally think that the spice blend in this mix could not be more perfect. My 16 month old son and 9 year old daughter LOVE them too! I have since tried all of their mixes and they are all wonderful! Health tip: when making these products, I prefer to use coconut oil for the oil mix-in ingredient. We know the multiple benefits of coconut oil and this is a perfect opportunity to include it in a recipe.

The Simple Mills distribution channels are still limited, however you can order directly from the company on their website and shipping was very inexpensive: Simple Mills Website

Here’s a picture of the pumpkin muffin mix I first tried…. YUM! Just in time for Fall, ENJOY!!

IMG_5116 IMG_5115